# Jenkins 3 - github 연동
## Git Integration 설치

## Git 설정

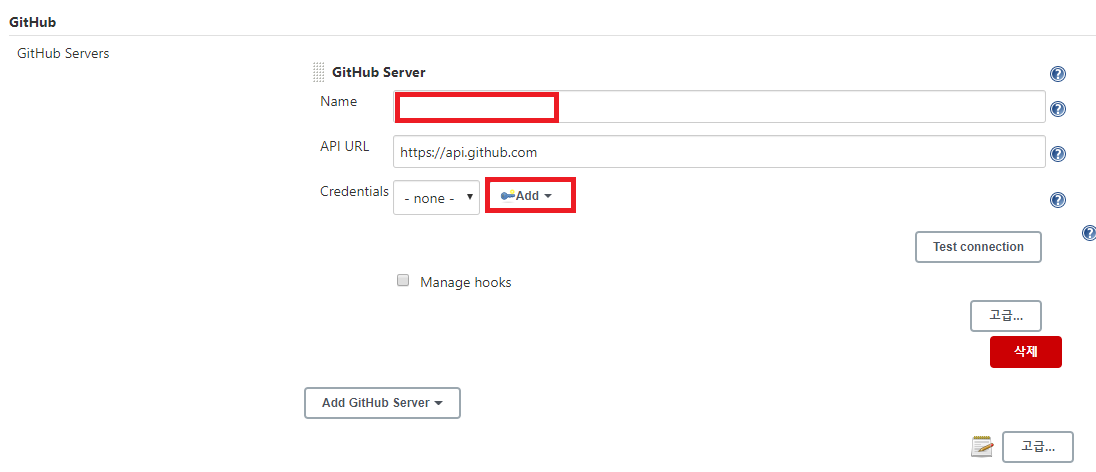\
name을 입력하고 Add 버튼 클릭
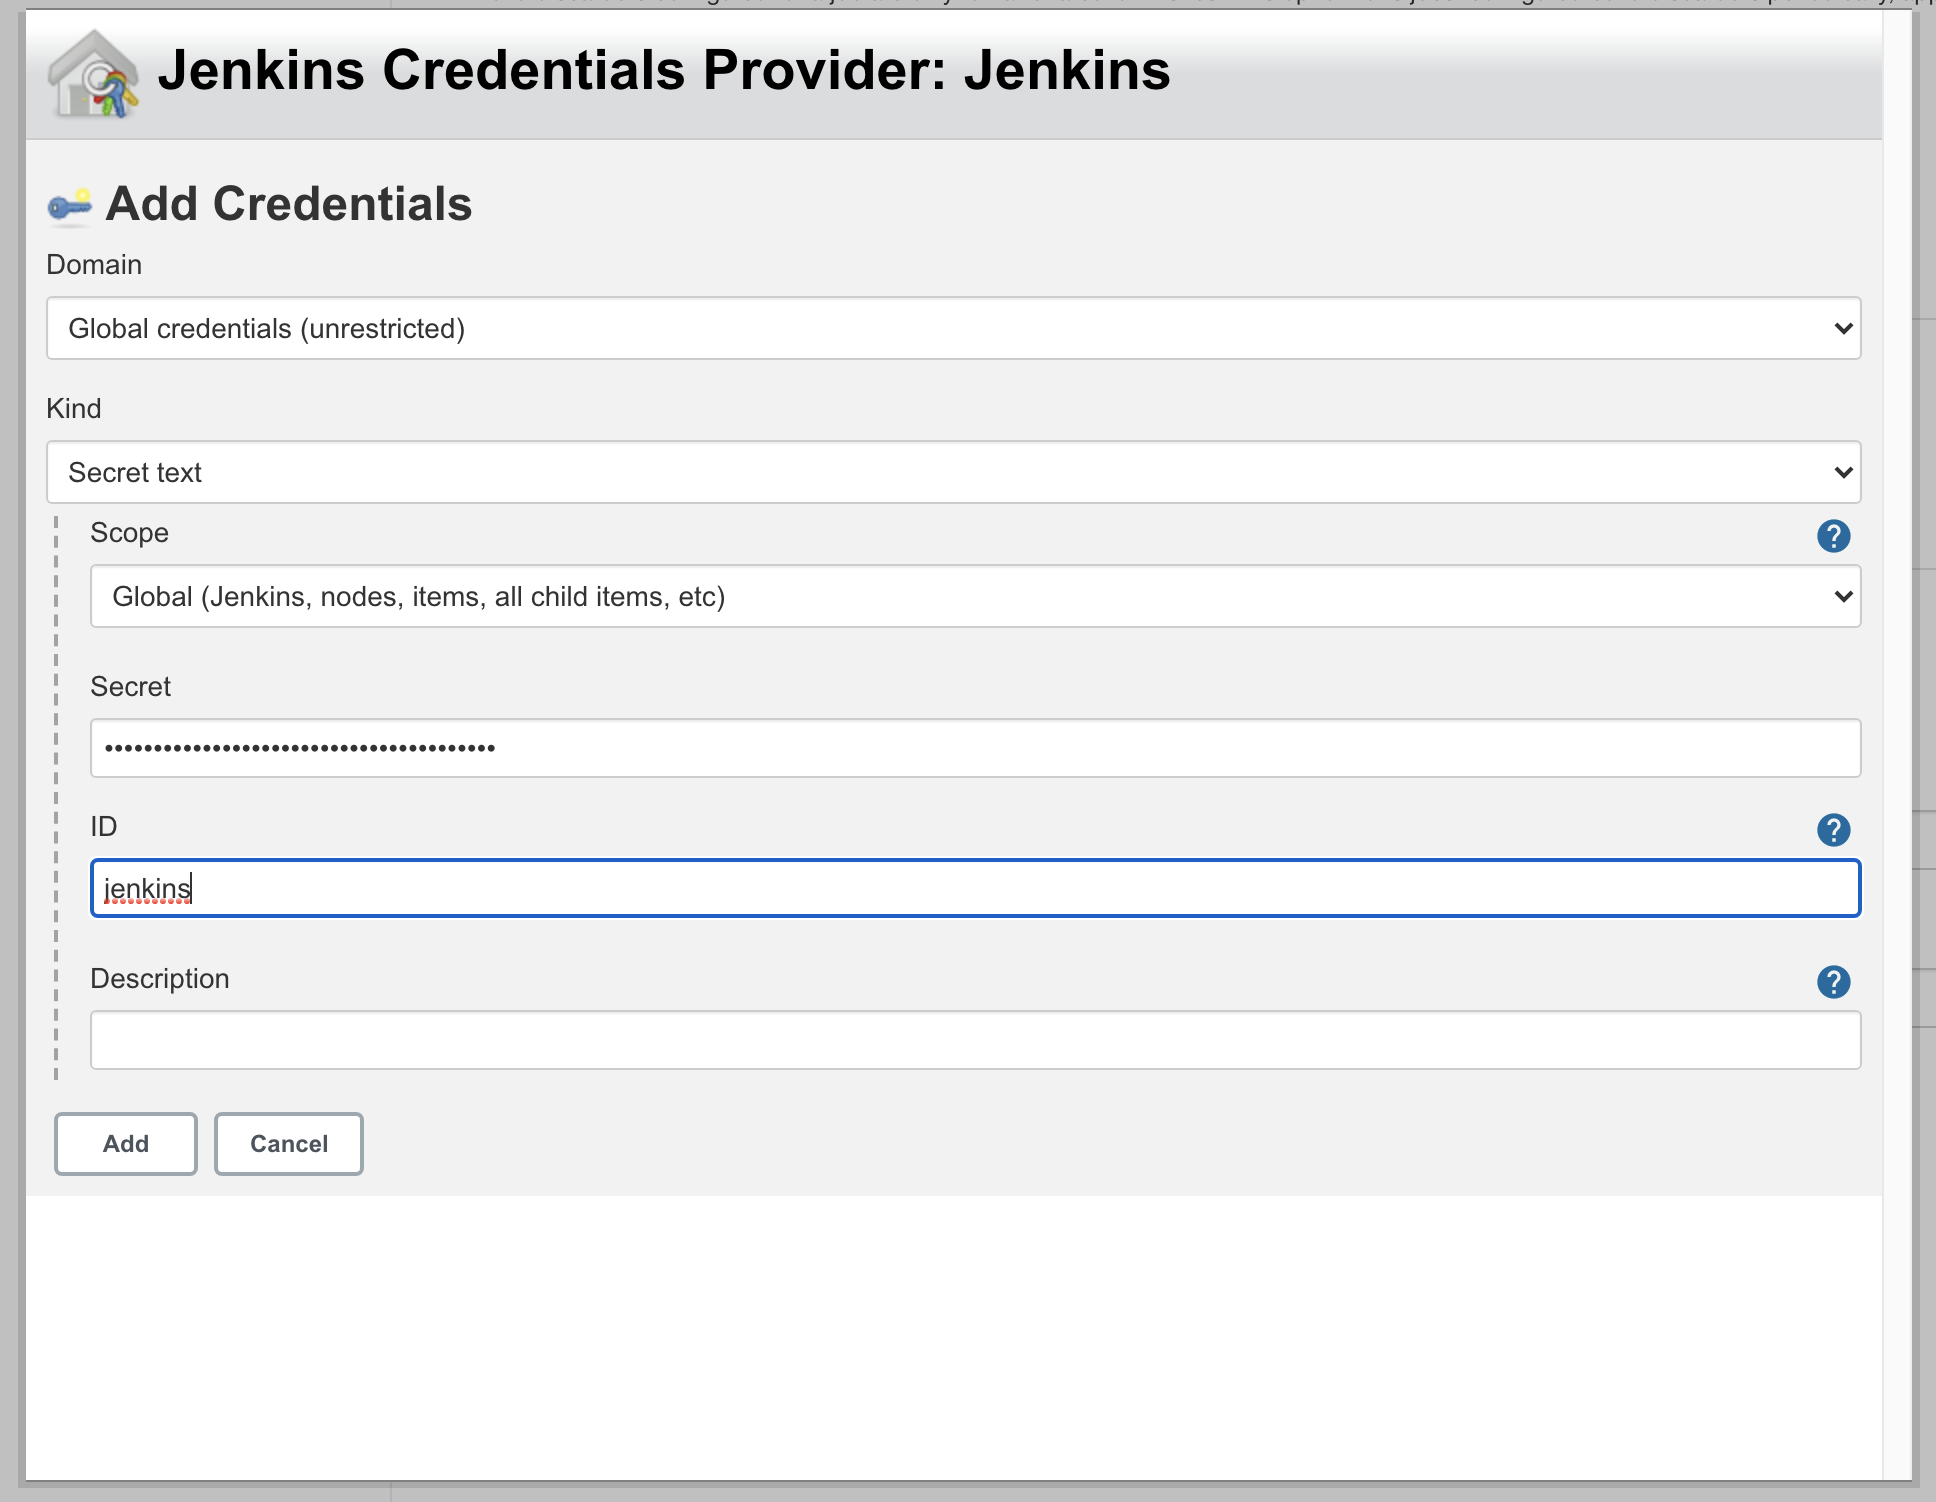
* Domain: Global credentials (unrestricted) 선택
* Kind : Secret text 선택
* Secret : 깃헙으로 부터 발급받은 토큰 키
* ID : 본인이 지정하는 식별자(ID) 입력
 * Add 버튼 옆에 있는 셀렉트 박스에서 추가했던 키를 선택후 테스트 커넥트를 클릭
* 유효하다면 하단에 저장버튼 클릭!
## Git 연동
\
새로운 아이템 클릭\
\
item name 작성 후 freestyle project 클릭후 ok 버튼 클릭\
\
깃허브 프로젝트 클릭후 내깃 주소 클릭\
\
Failed to connect to repository : Could not init\
만약 레포지토리 URL 입력 후 위같은 에러메세지가 뜬다면 도커 우분투에 apt-get install git을 해주면 된다.\
여기까지 입력되었으면 저장 클릭
Build Now 클릭후\
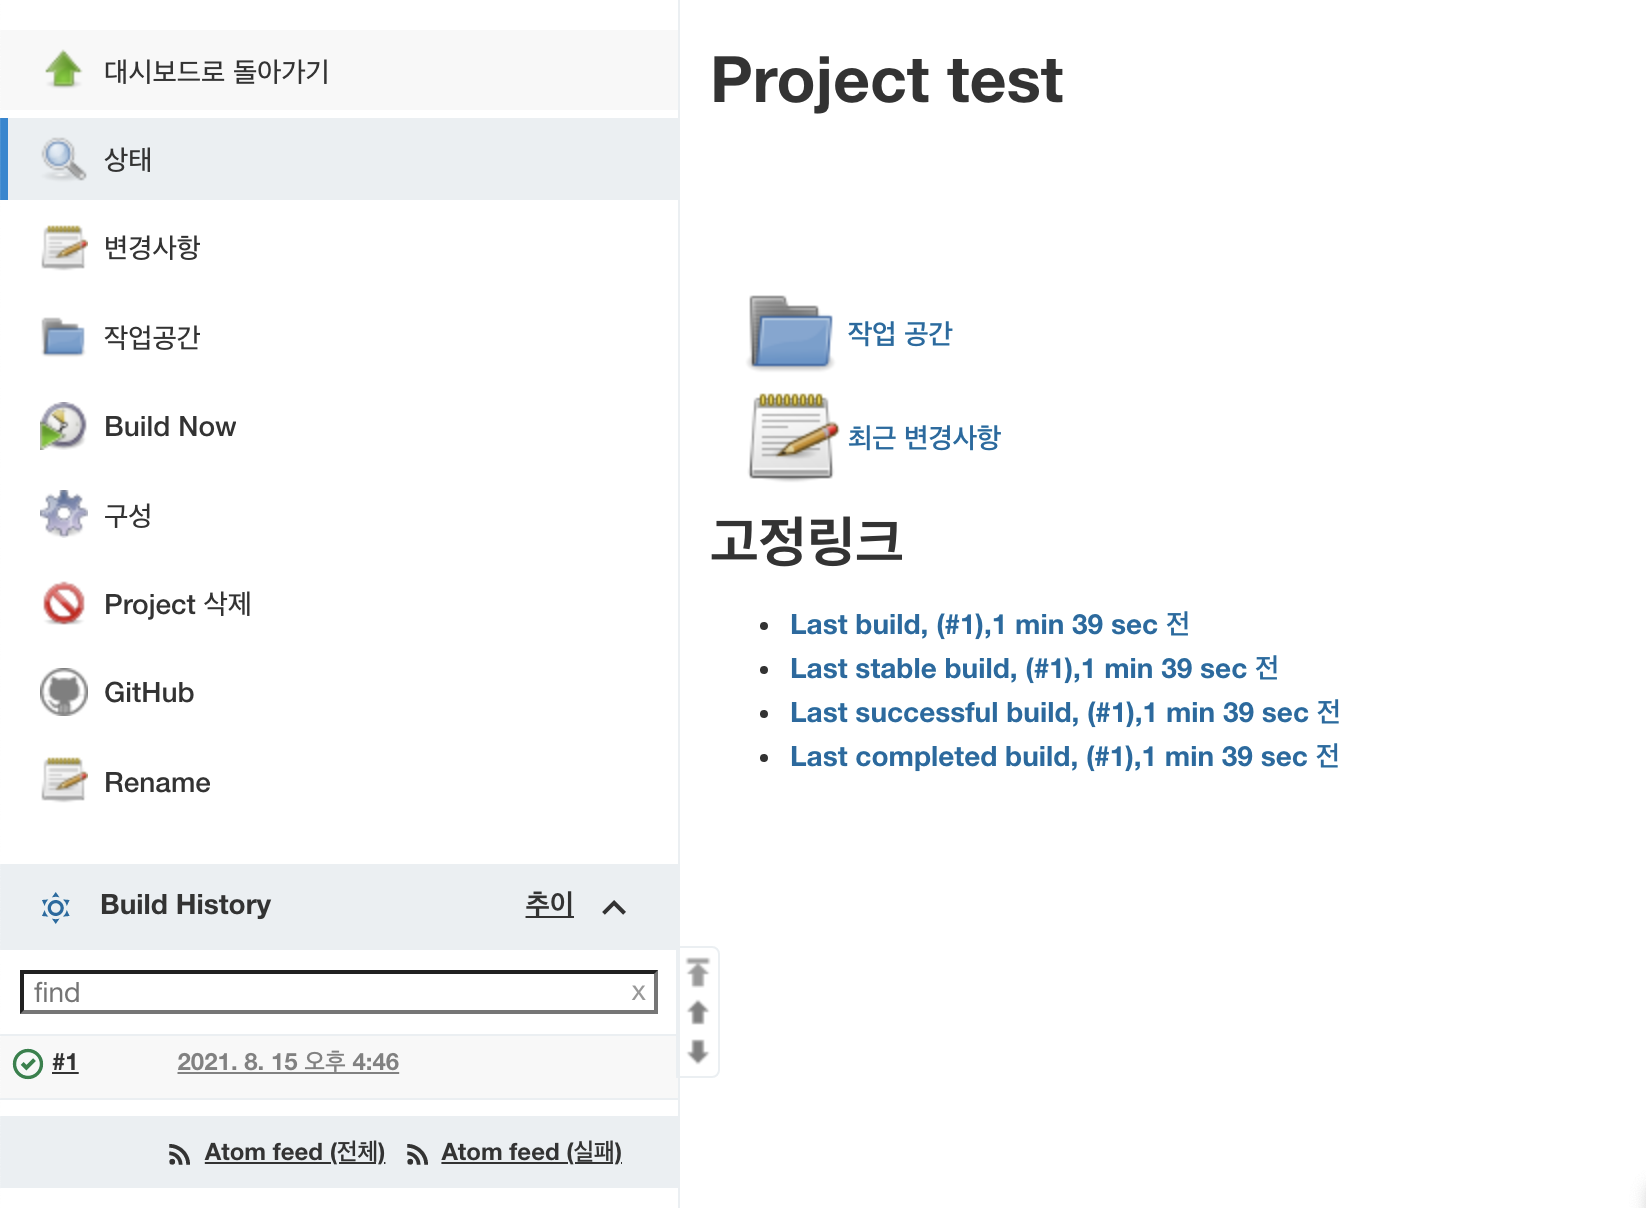\
BuildHistory를 보면 빌드가 성공한 것을 볼 수있음.
## jar 파일이 생성
프로젝트 구성에서 build클릭 후 excute shell 선택 후 다음과 같이 입력 하고 저장
```shell
echo ">>>> project Build Start!!"
./gradlew build
echo ">> pwd"
pwd
echo ">> go jar"
cd ./build/libs
JAR_NAME=$(ls|grep '0.0.1' | tail -n 1)
echo "jar name $JAR_NAME"
```
콘솔
```shell
Started by user cheol
Running as SYSTEM
Building in workspace /var/lib/jenkins/workspace/test
The recommended git tool is: NONE
No credentials specified
> git rev-parse --resolve-git-dir /var/lib/jenkins/workspace/test/.git # timeout=10
Fetching changes from the remote Git repository
> git config remote.origin.url https://github.com/thor/jenkins-test # timeout=10
Fetching upstream changes from https://github.com/thor/jenkins-test
> git --version # timeout=10
> git --version # 'git version 2.25.1'
> git fetch --tags --force --progress -- https://github.com/thor/jenkins-test +refs/heads/*:refs/remotes/origin/* # timeout=10
> git rev-parse refs/remotes/origin/master^{commit} # timeout=10
Checking out Revision 991e78dc134f5c929ba51a8ef56f69fa3088c2c7 (refs/remotes/origin/master)
> git config core.sparsecheckout # timeout=10
> git checkout -f 991e78dc134f5c929ba51a8ef56f69fa3088c2c7 # timeout=10
Commit message: "test"
> git rev-list --no-walk 991e78dc134f5c929ba51a8ef56f69fa3088c2c7 # timeout=10
[test] $ /bin/sh -xe /tmp/jenkins7079479207332199031.sh
+ echo >>>> project Build Start!!
>>>> project Build Start!!
+ ./gradlew build
Starting a Gradle Daemon (subsequent builds will be faster)
> Task :compileJava UP-TO-DATE
> Task :processResources UP-TO-DATE
> Task :classes UP-TO-DATE
> Task :bootJarMainClassName UP-TO-DATE
> Task :bootJar UP-TO-DATE
> Task :jar UP-TO-DATE
> Task :assemble UP-TO-DATE
> Task :compileTestJava UP-TO-DATE
> Task :processTestResources NO-SOURCE
> Task :testClasses UP-TO-DATE
> Task :test UP-TO-DATE
> Task :check UP-TO-DATE
> Task :build UP-TO-DATE
BUILD SUCCESSFUL in 5s
7 actionable tasks: 7 up-to-date
+ echo >> pwd
>> pwd
+ pwd
/var/lib/jenkins/workspace/test
+ echo >> go jar
>> go jar
+ cd ./build/libs
+ ls
+ grep 0.0.1
+ tail -n 1
+ JAR_NAME=jenkins-0.0.1-SNAPSHOT.jar
+ echo jar name jenkins-0.0.1-SNAPSHOT.jar
jar name jenkins-0.0.1-SNAPSHOT.jar
Finished: SUCCESS
```
\
출처 :
* Add 버튼 옆에 있는 셀렉트 박스에서 추가했던 키를 선택후 테스트 커넥트를 클릭
* 유효하다면 하단에 저장버튼 클릭!
## Git 연동
\
새로운 아이템 클릭\
\
item name 작성 후 freestyle project 클릭후 ok 버튼 클릭\
\
깃허브 프로젝트 클릭후 내깃 주소 클릭\
\
Failed to connect to repository : Could not init\
만약 레포지토리 URL 입력 후 위같은 에러메세지가 뜬다면 도커 우분투에 apt-get install git을 해주면 된다.\
여기까지 입력되었으면 저장 클릭
Build Now 클릭후\
\
BuildHistory를 보면 빌드가 성공한 것을 볼 수있음.
## jar 파일이 생성
프로젝트 구성에서 build클릭 후 excute shell 선택 후 다음과 같이 입력 하고 저장
```shell
echo ">>>> project Build Start!!"
./gradlew build
echo ">> pwd"
pwd
echo ">> go jar"
cd ./build/libs
JAR_NAME=$(ls|grep '0.0.1' | tail -n 1)
echo "jar name $JAR_NAME"
```
콘솔
```shell
Started by user cheol
Running as SYSTEM
Building in workspace /var/lib/jenkins/workspace/test
The recommended git tool is: NONE
No credentials specified
> git rev-parse --resolve-git-dir /var/lib/jenkins/workspace/test/.git # timeout=10
Fetching changes from the remote Git repository
> git config remote.origin.url https://github.com/thor/jenkins-test # timeout=10
Fetching upstream changes from https://github.com/thor/jenkins-test
> git --version # timeout=10
> git --version # 'git version 2.25.1'
> git fetch --tags --force --progress -- https://github.com/thor/jenkins-test +refs/heads/*:refs/remotes/origin/* # timeout=10
> git rev-parse refs/remotes/origin/master^{commit} # timeout=10
Checking out Revision 991e78dc134f5c929ba51a8ef56f69fa3088c2c7 (refs/remotes/origin/master)
> git config core.sparsecheckout # timeout=10
> git checkout -f 991e78dc134f5c929ba51a8ef56f69fa3088c2c7 # timeout=10
Commit message: "test"
> git rev-list --no-walk 991e78dc134f5c929ba51a8ef56f69fa3088c2c7 # timeout=10
[test] $ /bin/sh -xe /tmp/jenkins7079479207332199031.sh
+ echo >>>> project Build Start!!
>>>> project Build Start!!
+ ./gradlew build
Starting a Gradle Daemon (subsequent builds will be faster)
> Task :compileJava UP-TO-DATE
> Task :processResources UP-TO-DATE
> Task :classes UP-TO-DATE
> Task :bootJarMainClassName UP-TO-DATE
> Task :bootJar UP-TO-DATE
> Task :jar UP-TO-DATE
> Task :assemble UP-TO-DATE
> Task :compileTestJava UP-TO-DATE
> Task :processTestResources NO-SOURCE
> Task :testClasses UP-TO-DATE
> Task :test UP-TO-DATE
> Task :check UP-TO-DATE
> Task :build UP-TO-DATE
BUILD SUCCESSFUL in 5s
7 actionable tasks: 7 up-to-date
+ echo >> pwd
>> pwd
+ pwd
/var/lib/jenkins/workspace/test
+ echo >> go jar
>> go jar
+ cd ./build/libs
+ ls
+ grep 0.0.1
+ tail -n 1
+ JAR_NAME=jenkins-0.0.1-SNAPSHOT.jar
+ echo jar name jenkins-0.0.1-SNAPSHOT.jar
jar name jenkins-0.0.1-SNAPSHOT.jar
Finished: SUCCESS
```
\
출처 :
#### 참고
---
# Agent Instructions: Querying This Documentation
If you need additional information that is not directly available in this page, you can query the documentation dynamically by asking a question.
Perform an HTTP GET request on the current page URL with the `ask` query parameter:
```
GET https://taejun.gitbook.io/tech/14-ci-cd-devops-sre/jenkins-1/jenkins-3-github.md?ask=
```
The question should be specific, self-contained, and written in natural language.
The response will contain a direct answer to the question and relevant excerpts and sources from the documentation.
Use this mechanism when the answer is not explicitly present in the current page, you need clarification or additional context, or you want to retrieve related documentation sections.